If you're staring down a rusty, sagging front end on an old F-150 and thinking about a 1997 F-150 lowering kit, this post is for you. We tore into the front suspension of a '97 Ford F-150, diagnosed exactly why it needed more than just a drop, and walked through a full DJM 4/6 drop kit installation, including control arms, ball joints, shocks, alignment cams, and the rear flip kit that makes the 6-inch rear drop possible.
Why This Truck Needed More Than a Lowering Kit
Before touching any new parts, we checked the front end the way you should check any 20+ year old truck: looking for play in the ball joints. Check in two directions: side to side and up and down. This truck was tight side to side, but had noticeable play in the vertical direction, which meant the upper and lower ball joints were worn out.
That's actually good news if you're shopping for Ford F-150 lowering kits, because a quality kit replaces those wear parts as part of the installation anyway. You're not just lowering the truck but also addressing worn suspension components at the same time.
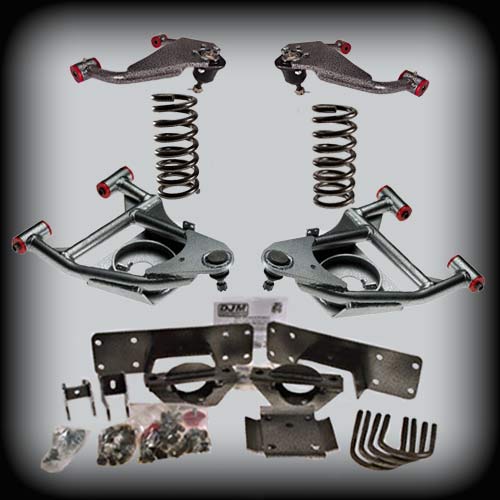
What's in the Box
Unboxing this 1997 – 2003 Ford F-150 4 Inch front 6 Inch Rear Complete Lowering Kit (Shocks Included) confirmed it's built to a higher standard than the stock replacement parts you'd get from a dealer parts counter.
The F-150 lowering kit includes:
- Upper and Lower Control Arms: Powder-coated, with a finish that matches the included springs.
- Moog Ball Joints: Installed in both the upper and lower control arms, fully serviceable with grease fittings, unlike the factory upper control arms, which are non-serviceable and require replacing the entire arm assembly when the ball joint wears out.
- Polyurethane Bushings: Fitted on the control arms, these don't flex like rubber bushings, which is good for handling, though they can be noisier.
- Four New Shocks: Each with a safety wire installed on one end, a small detail that matters since you should always be checking shock threads before installation, and the wire keeps debris and grease off the threads until you're ready.
- Upper Control Arm Bolts With Adjuster Cams: These are the crash bolts that let you dial in caster and camber after the truck is lowered.
- Nylock Hardware: Used throughout, with nuts that have a nylon insert acting as built-in thread lock.
| Pro Tip: Those adjuster cam bolts aren't something you can source separately from Ford. The dealer can sell you the bolt, but the cams and nuts that go with it have been discontinued for years. If you're doing this job on a stock truck, that alignment adjustment hardware is really only coming from the kit. |
Tearing Down the Front End
This is an important part of installing a 4/6 drop kit for your Ford F-150, which helps you address the issue of rust. On a truck that's spent 20-plus New England winters exposed to road salt, the lower control arm bolts had essentially welded themselves into the bushing sleeves.
A few things that got this truck apart without damaging anything:
- PB Blaster(opens in new tab), liberally and repeatedly, on every bolt and joint before attempting to break it loose.
- A torch for the bolts that wouldn't budge with an impact gun alone. Heat expands the metal and breaks the rust bond, and in some cases lets entire bolts come out cleanly instead of having to be drilled or cut.
- Recognize which side is worse before you start. On a vehicle that's spent its life on U.S. roads, the passenger side collects more road salt and grime than the driver's side, so expect it to fight you harder.
Once the old upper and lower control arms, ball joints, and shocks were out, the rusted factory ball joints showed exactly the kind of play that had shown up in the earlier inspection. This was a confirmation that the diagnosis was right before a single new part went in.
| Pro Tip: Heat the bolt, not just the nut. Focus the torch on the sleeve and bushing area where the bolt has actually rusted in place, not the head. Heating the wrong spot wastes time and risks scorching the new bushings you're about to install. |
Installing the New Control Arms, Ball Joints, and Bushings
With the front end torn down, the install itself moved fast. A few things worth doing right:
- Grease the polyurethane bushings generously before installing the sleeves. Assembly lube keeps everything sliding into place correctly and prevents the bushing from binding.
- Don't overtighten the bushings. You want the arm bolted in tight enough that nothing's loose, but not so tight that you're crushing the bushing material. Both control arms should feel snug but not squeezed.
- Zerk fittings on the Moog ball joints mean you can grease them any time they start making noise, for the life of the truck. It’s a real advantage over a sealed factory joint that just gets replaced when it fails.
- Final torque should happen with the truck's full weight on the ground, ideally on an alignment rack. Without one, the practical approach is to snug everything up in the driveway, drive the truck 10 to 20 miles, then come back and recheck every fastener.
- Before buttoning things up, cycle the steering lock to lock and confirm nothing in the new suspension, including control arms, spring, or shock, is contacting the frame or spring perch.
Reassembling the spring, sway bar, and shock is straightforward once the control arms are in. Compress the spring into place, reconnect the sway bar end link, and torque the shock into the lower control arm mount.
| Pro Tip: Snug every bolt by hand-feel first, then do a second pass with a torque wrench once the whole assembly is together. Torquing one bolt fully before the others are seated can pull the control arm out of alignment before you ever get it on the ground. |
The Payoff: Dropping It on the Ground
After the brakes and rotors went back on (the rotors were machined at a shop since they'd surface-rusted from sitting), the truck came off the jack stands. The difference was immediate: what was better than six inches of gap between the tire and fender before now measured closer to two. That's a proper Ford F-150 lowered front end, not just a slight sag.
The Rear Axle Flip Kit: How the 6-Inch Drop Actually Works
The rear half of this 4/6 drop kit works completely differently than the front. A stock F-150's rear axle sits underneath the leaf springs. However, the 1997-2003 Ford F-150 6-inch Rear Axle Flip Kit relocates the axle to sit on top of the springs instead, which is what creates the drop in ride height.
Because the axle is now positioned differently relative to the frame, you also have to notch and clear the frame at the relocation point and weld in reinforcing braces. That clearance is what gives the axle enough room to travel up and down through its full range without losing suspension travel, even after dropping the rear 6 inches.
The 1997 Ford F-150 lowering kit itself includes the relocation brackets, the lower brackets that clamp around the axle, and all the hardware needed to tie it together. It’s the same Nylock-nut quality found in the front kit components.
Get Your Truck Riding Lower and Driving Tighter
Whether you're planning a full install with a 1997 Ford F150 lowering kit or just replacing worn-out ball joints and control arms on an old truck, the front half of this job proves that you can fix the worn steering and suspension components at the same time you lower the truck.
The rear flip kit is a more involved modification, but it's what makes a true 4/6 drop possible without sacrificing ride quality or suspension travel. That’s why we trust DJM Suspension kits so much.
DJM Suspension has been building lowering kits and suspension components for trucks and cars since the 1970s, with a reputation for hardware that holds up long-term. Every kit is designed to solve fit, function, and ride quality together, not just drop your ride height.
Ready to stop fighting worn suspension and get your truck sitting the way you want it? Shop different lowering kits at DJM Suspension and get everything you need for the front and rear in one box.