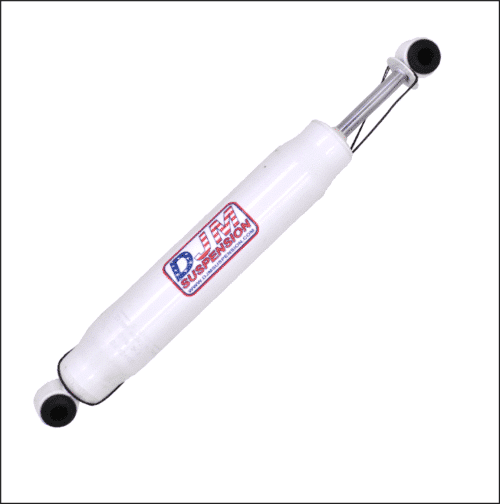
1973-1987 C10 Complete 5 inch Front / 5 inch Rear Lowering Kit (Shocks Included)
$1,166.58
Lower your 1973–1987 Chevy C10 by 5 inches in the front and 5 inches in the rear with this complete DJM Suspension kit. The package combines front lowering control arms, 2-inch lowering coil springs, a rear axle flip kit, and front and rear shocks.
Get the classic lowered C10 look you’ve always wanted with DJM Suspension’s complete 5/5 drop kit. Designed for 1973-1987 Chevy C10 trucks, this suspension package brings the front and rear closer to the pavement for a balanced stance. And with shocks included, your lowered C10 rides comfortably.
- 3-inch front lowering control arms
- 2-inch front lowering coil springs
- 5-inch rear axle flip kit
- Front and rear shocks
- Description
- Additional information
- Lower Control Arm Instructions
- Front Coil Spring Instructions
- Rear Flip Kit Instructions
Description
Recommended Paired & Replacement Parts
Keep your 1973-1987 Chevy C10 lowering kit performing at its best with compatible replacement shocks, ball joints, and bushings. DJM Suspension offers the following parts to help maintain your truck's lowered suspension.
DJM recommends:
- Front Shock: 13.5" Loop / Loop SuperShock (1309) (sold each).
- Rear Shock: 21.5" Loop / Loop SuperShock (2100) (sold each).
Replacement Parts
- Ball Joint 6117 (Moog K6117)
- Bushing Kit BK2456L
Why Buy from DJM Suspension
American-Made Suspension Components
DJM Suspension manufactures suspension components in the USA for a range of vehicle-specific lowering applications.
Decades of Lowering Suspension Experience
With roots in the aftermarket automotive industry dating back to the early 1970s, DJM Suspension brings decades of experience to its lowering products.
Solutions for Classic Truck Builds
DJM Suspension offers lowering components and complete kits for classic C10 trucks, allowing owners to choose suspension setups suited to their vehicle and desired drop.
About DJM Suspension
DJM Suspension is a family-owned and operated company specializing in aftermarket suspension products for cars and trucks. Its product range includes lowering components and complete suspension kits for enthusiasts customizing their vehicles.
Frequently Asked Questions
Shop the Complete C10 5/5 Lowering Kit
Bring your truck closer to the pavement with DJM Suspension's complete 5/5 C10 drop kit. Order yours today and get started on your build.
Additional information
1971-1987 C10 3 inch Lowering Control Arms (Disc Brakes Only)
| Weight | 45 lbs |
|---|
1973-1987 C10 5 inch Rear Axle Flip Kit
| Weight | 10 lbs |
|---|
1963 - 1987 C-10 2″Front Lowering Coil Spring
| Weight | 20 lbs |
|---|
13.5″ Loop / Loop SuperShock (1309)
| Weight | 3 lbs |
|---|
21.5″ Loop/ Loop SuperShock (2100)
| Weight | 3 lbs |
|---|
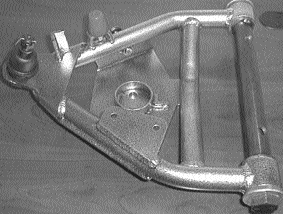
PART # CA2355L-3, CA2356L-3
1963-1987 Chevy C10 Pickup Lower Control Arms
Installation Instructions
Please Note: Unless specifically stated, all DJM lowering components are intended exclusively for two wheel drive applications only!!!
Please take the time to read these Installation Instructions and check the Hardware Parts List to be sure you have all the listed parts.
DJM parts should be installed by qualified mechanics. If you are not familiar with automotive repair have the parts installed by someone with experience.
Please read the warranty information (blue page enclosed). Complete your Product Warranty Card and mail it to DJM Suspension.
Please take a few minutes to fill out your installation helper (back side of warranty). Accurate measurements BEFORE BEGINNING INSTALLATION will show any irregularities in your vehicle.
NEVER WORK UNDER TRUCK SUPPORTED BY A JACK ONLY!!!
USE QUALITY JACK STANDS WHICH HAVE A RATING ADEQUATE FOR YOUR TRUCK'S WEIGHT!!!
This kit is designed to be used with factory coil springs or DJM 2" coil #CS2353-2.
MODIFYING FOR AIR BAGS WILL VOID DJM'S WARRANTY!!
New front shocks #1409 are recommended, but not required.
New front shocks #1309 are required with 2" coils.
INSTALLER MUST CHECK THAT THERE IS ABSOLUTELY NO CLEARANCE PROBLEMS BETWEEN THE WHEELS, THE SPINDLE, THE CALIPER, THE LOWER CONTROL ARMS AND ANY OTHER COMPONENT BEFORE DRIVING VEHICLE.
CA2355L-3 Fits 63-70 with drum brakes — uses 6023 Ball Joints, DJM cross shafts.
CA2356L-3 Fits 71-87 with disc brakes — uses 6117 Ball Joints, DJM cross shafts.
Hardware Parts List
| 1 | Left Lower Control Arm |
| 1 | Right Lower Control Arm |
| 4 | Pivot Bushings and Sleeves |
| 1 | Tube Loctite |
| 6 | Grease Fittings |
| 2 | Ball Joints (Installed) |
| 2 | Bump Stops (10R) |
| Lower Shock Mount Hardware: | |
| 2 | 5/8"x18x3" Bolts |
| 4 | 5/8" Flat Washers |
| Additional Hardware — CA2455L-3 Only: | |
| 4 | Retaining Washers |
| Additional Hardware — CA2355L-3 & CA2356L-3 Only: | |
| 2 | DJM Cross Shafts (Installed) |
Installation
-
Install grease fittings into control arms and ball joints. Pre-grease bushings with a grease gun to test that grease will flow properly. Grease the ball joint before installing it on the truck.
-
Line up pins for cross shaft and install using factory U-bolts. When ball joint is tight, install cotter pin.
-
Before installing the sway bar bracket to the control arm, loosen the bolts that hold the D-bushings to the frame under the bumper. Raise the lower control arm to ride height and install sway bar brackets and tighten.
-
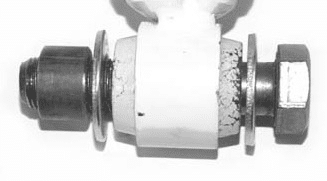
If re-using old shocks, use all factory hardware on the upper mount. If replacing shocks with new DJM shocks, new upper hardware is included with the shocks.
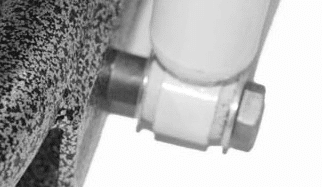
Both upper and lower shock mounts are the same except for the nut on the upper mount — on the lower mount the nut is welded to the control arm.
Assemble the shock bolt with washers and spacers as shown. Attach with the nut supplied on the upper mount, and thread the bolt into the nut on the control arm for the lower mount.

Upper shock mount — assemble bolt with washers and spacers, attach with nut supplied
Lower shock mount — thread bolt into nut welded to the control arm
Front Coil Springs
Installation Instructions
Please take the time to read these INSTALLATION INSTRUCTIONS and check the Hardware Parts List to be sure you have all the listed parts, and the tools necessary to safely complete the installation! Please read the warranty information (blue page enclosed). Complete your Product Warranty Card and mail it to DJM Suspension.
Please take a few minutes to fill out your installation helper (back side of warranty). Accurate measurements BEFORE BEGINNING INSTALLATION will show any irregularities from side to side of your vehicle.
NEVER WORK UNDER TRUCK SUPPORTED BY A JACK ONLY!!!
USE QUALITY JACK STANDS WHICH HAVE A RATING ADEQUATE FOR YOUR TRUCK'S WEIGHT!!!
NEW FRONT SHOCKS ARE ALWAYS REQUIRED WHEN INSTALLING LOWERED COIL SPRINGS. REFER TO APPLICATION CHART FOR CORRECT PART NUMBER.
Hardware Parts List
| 2 – Front Coil Springs |
| 2 – Tall Bump Stops (as required) |
-
Park your truck on a flat, level surface. Chock the rear wheels. Loosen the front lug nuts. Raise the front with a floor jack. Support the frame with jack stands. Remove the front wheels.
NOTE: ALWAYS USE JACK STANDS – NEVER RELY ON JACKS ONLY!!
-
Remove the front shock. Remove the cotter pin and nut from the tie rod end. Remove the tie rod end from the spindle. Loosen and remove the sway bar end links (if equipped).
-
Working on one side at a time, place a floor jack under the front lower control arm. Remove the cotter pin and loosen the nut from the lower ball joint. Tap the spindle to loosen the taper, and remove the nut.
-
With the ball joint loosened, lower the floor jack slowly until the ball joint is out of the spindle. Swing the spindle out of the way. Slowly lower the floor jack until the stock coil spring can be removed. Be careful not to tear the rubber pad (if equipped).
-
Now place the rubber pad (if equipped) on the same end of the new spring. Place the new spring back into the lower control arm, holding the top of the spring straight. Slowly raise the lower control arm with the floor jack until the ball joint is aligned with the spindle hole and the spring is seated in the upper and lower mount. The spring may need to be turned while raising the floor jack.
-
Install the ball joint nut and tighten, then install the tie rod end into the spindle and tighten the nut. Install new cotter pins in the ball joint and tie rod end.
-
Attach the sway bar end link to the lower control arm and install the new front shock.
-
Repeat the procedure on the other side of the vehicle.
-
Install wheels and torque lug nuts.
-
Take the vehicle for a test drive and have the front end aligned at a qualified alignment shop.
Part # FK1024-5
1973–1987 Chevy C10 Rear Flip Kit
Installation Instructions
Rev. # 12-02
Please Note: Unless specifically stated, all DJM lowering components are intended exclusively for two wheel drive applications only!!!
Please take the time to read these INSTALLATION INSTRUCTIONS and check the Hardware Parts List to be sure you have all the listed parts.
These installation instructions are prepared for the professional installer with the proper equipment, tools and experience in suspension systems and safety. This vehicle and its components are extremely heavy and can be dangerous without the proper equipment and experience.
Please read the warranty information (blue page enclosed). Complete your Product Warranty Card and mail it to DJM Suspension.
Please take a few minutes to fill out your installation helper (back side of warranty). Accurate measurements BEFORE BEGINNING INSTALLATION will show any irregularities in your vehicle.
NEVER WORK UNDER TRUCK SUPPORTED BY A JACK ONLY!!! USE QUALITY JACK STANDS WHICH HAVE A RATING ADEQUATE FOR YOUR TRUCK'S WEIGHT!!!
New shocks are required. Use DJM Part #2200 (2 required).
Hardware Parts List
| Axle Flip Kit | Lower Shock Extenders |
|---|---|
| 2 – Axle Locators (1024) | 2 – Shock Extenders (1124) |
| 2 – Urethane Bump Stops (10S) | 2 – 1/2" x 20 x 3-1/2" Bolts |
| 2 – 1/2" Nuts | |
| 4 – 1/2" Flat Washers | |
| 6 – 1/2" x 20 x 1" Bolts | |
| 6 – 1/2" x 20 Jam Nuts | |
| 12 – 1/2" Lock Washers |
Relocating (Flipping) Rear Axle
-
Reverse the leaf spring center bolt so the nut is on the bottom.
-
Place the new axle locator bracket on top of the spring, with the off-center hole toward the front of the vehicle. This will center the rear axle and pull the drive shaft back from the transmission slightly.
-
Lower the rear axle so the new axle supports fit up inside the existing rear axle pad welded to the axle. Mark and drill a hole in the factory spring plate for the spring center pin. This hole is offset just like the flip bracket. Install the factory U-bolts and factory spring plate on the bottom of the springs. Tighten U-bolts. FK1024-LTD includes new U-bolts and plates.
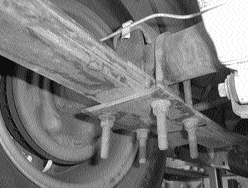
Picture shown may not depict your axle -
Remove the factory bump stop bracket from the frame. Drill a 3/8" hole to install the bump stop to the frame.
-
Now install the new shock extenders. Slide them over the existing shock mount. The rounded end will be down; this is the end the shock will bolt to. Align the original shock mounting holes with the shock extenders. Install one 1/2" x 20 x 1" bolt in each hole, with lock washers and jam nuts (Nuts on inside!). Using the shock extender as a template, line drill a 1/2" hole through the original shock mount and secure with a 1/2" x 1" bolt, washer and nut. Install the new shock to the rounded end with 1/2" x 20 x 3-1/4" bolts, lock washers and nuts. Tighten all bolts.
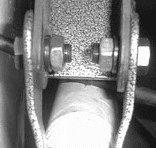
Shock extender installed over factory mount -
Install new rear shocks.
-
Test drive vehicle.
-
Measure the amount of drop and record it on the installation helper.


Note: Two-piece drive shafts on most 1/2 ton trucks should be replaced with one-piece drive shafts. If you must retain your two-piece drive shaft, modify the carrier bearing frame support so it can be raised approximately 1-1/2" to correct the drive line angle.