When you drive your truck, does it feel like it's swaying all over the place? Do you feel every bump and sway while driving? If that's what driving your Chevy Avalanche, Suburban, or Tahoe is like every day, it might be time for an upgrade.
A rear sway bar adjustment can completely change how your truck handles, giving you that smooth, controlled ride you've been craving. Whether you're dropping the rear end or simply improving performance, a rear sway bar install is key for better ride stability and sharper handling.
This post will walk you through installing the rear sway bar to upgrade your ride into a true road warrior.
Why Upgrade: The Critical Need for Trailing Arm and Rear Sway Bar Relocation
When you lower the rear of your Chevy Avalanche, Suburban, or Tahoe, the suspension geometry can get thrown out of alignment. The rear sway bar can end up in a position where it doesn't function properly. This can lead to poor ride quality and less-than-ideal handling, especially on tight corners or during hard driving.
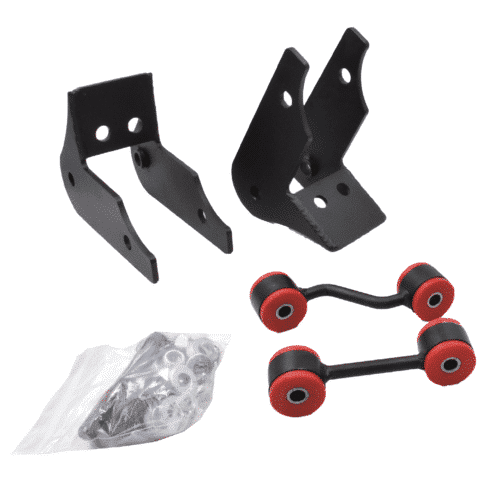
DJM Suspension has created the rear sway bar Chevy bolt and rear lowering kit to solve these problems. This kit adjusts the sway bar and relocates the lower trailing arm to make sure the rear suspension works as intended. It results in a smoother ride, improved handling, and the peace of mind that your vehicle is driving as it should.
Tools You’ll Need for Rear Sway Bar Installation
Before we get into the step-by-step rear sway bar installation process, make sure you have the following tools:
- Basic socket and wrench set
- Grease for urethane bushings
- Drill and drill bit for one hole on the sway bar relocation step
- Jack and Jack stand
- Shop rags to wipe excess grease
- New bolts and Nyloc nuts, if you want all fresh hardware
- Torque wrench
Step-By-Step: Trailing Arm and Rear Sway Bar Installation
When it comes to rear sway bar adjustment, it’s advisable to allocate a few hours and understand every step ahead of time is vital. Each of these steps reflects the everyday challenges faced by both DIYers and seasoned pros.
Step 1: Preparing Your Workspace and Vehicle
Start by safely elevating the vehicle. Make sure it’s on solid, level ground. Always use jack stands as a safety net. Gather your tools. Typically, you will need standard wrenches and sockets, suitable grease (urethane-compatible), and the hardware included in your kit.
Inspect the rear suspension and look for any bound arms or wear in the bushings. Address any incidents of damage before you start the rear sway bar installation or trailing arm relocation.
Step 2: Installing the Trailing Arm Relocation Bracket
The heart of this upgrade lies in unbinding the trailing arm by repositioning it with a tailored bracket. This step makes sure the lower trailing arm moves freely, and the pinion angle remains correct.
- Locate the lower trailing arm. On lowered trucks (5” or more is common for Chevy Avalanche, Suburban, and Tahoe), this arm often sits at an angle that causes binding.
- Remove any hardware as needed. The DJM Suspension kit uses no-drill brackets, streamlining the process.
- Attach the relocation bracket using the provided rear sway bar Chevy bolt and hardware. These are standard ½”-13 bolts, sized 2 and 3/4 inches long, using Nyloc nuts for safety.
- Tighten bolts snugly, but do not overtighten, to maintain bushing integrity. Be sure each connection is secure, but not overly compressed, as this is critical.
This bracket changes the parameters under which the arm operates, providing better rear wheel travel and drivetrain angle.
Step 3: Sway Bar End Link Relocation and Rear Sway Bar Adjustment
One of the most misunderstood sections of the kit is the rear sway bar adjustment. The original end links are often too long, rendering the rear sway bar ineffective after a significant drop. Achieving proper geometry is a must for both function and clearance.
- Remove the stock sway bar end links.
- Attach the relocation brackets at the recommended mounting points. You may need to drill a single hole for the new mounting location, but most holes exist from the factory.
- Use plenty of grease on the urethane bushings. This safeguards against squeaks and provides free movement. Greasing is not merely aesthetic; it also indicates when the bushings are correctly compressed.
- Insert the new hardware, reusing two original bolts plus two new Nyloc bolts.
- When tightening, watch for grease migration as a guide. Only tighten until the bushings slightly deform. Typically, just a few pounds of pressure, enough to stop end play but retain free movement.
By shifting the rear sway bar slightly to clear the panhard bracket, you guarantee the bar moves through its full range without contact. This adjustment makes sure the sway bar operates in parallel with the axle, supporting proper handling.
Step 4: Finalize the Rear Sway Bar Install and Check Clearances
Now that the rear sway bar installation is complete and the arms are relocated, you should:
- Cycle the suspension through its range to verify clearance between the rear sway bar and the panhard bracket.
- Confirm all bolts, including every rear sway bar Chevy bolt, are properly snugged, but bushings are not compressed excessively.
- Wipe any excess grease.
- Double-check all adjustments to ensure safety and performance.
The sway bar should move freely with zero contact, and all end links must be vertical or close to it when the vehicle is resting.
What This Upgrade Does for Your Ride
It’s important to note the transformation you’ll experience. A correctly installed trailing arm and rear sway bar means:
- Boundless rear suspension movement, eliminating the “stiff” ride feeling.
- As the pinion angle remains ideal, drivetrain and differential longevity improve.
- Rear sway bar adjustment helps you unlock robust handling benefits without the aftermath of knocks and thumps over bumps.
- End links work at the correct geometry, making your rear sway bar an active part of the suspension again.
A Simple Upgrade that Brings Back Ride and Handling
A lowered Avalanche, Suburban, or Tahoe can ride and handle the right way, but the suspension geometry needs correction. The DJM Suspension RK2000 kit targets the two biggest trouble spots: trailing arm bind and sway bar interference.
Once you relocate the trailing arm and set the rear sway bar up with the right link position, proper clearance, and correct bushing tightness, you get a smoother ride and more predictable handling. Your truck stops fighting itself, and the rear sway bar finally does its job again.
If you want your lowered SUV to feel stable, comfortable, and controlled, this relocation kit is one of the smartest fixes you can install in an afternoon. At DJM Suspension, we manufacture American-made suspension parts for various classic and contemporary trucks.
For technical tips or help with your upgrades, please reach out to us at 310-538-1583 or tech@djmsuspension.com.