Lowering a 1988-1998 Chevy or GMC C-1500 changes more than the stance. It changes spring position, control arm angle, rear axle location, shock travel, and alignment access. That is why a clean install depends on process, not speed.
This platform is still one of the most common lowered trucks in the United States. Many owners want the look, but the real goal is a truck that sits right, drives straight, and does not fight the suspension every mile. That outcome comes from careful spring seating, proper final tightening, and a correct alignment setup.
The bottom line is that every part must settle at ride height before final torque. Skip that step, and the truck may develop bushing preload, poor spring seating, or alignment issues that show up right away.
Start with Inspection and Prep
Before any spring goes in, the truck needs a full inspection. Check ball joints, tie rods, control arm bushings, wheel bearings, brake hoses, and rear leaf spring hardware. A lowering kit will not hide worn parts. It will make weak points easier to feel.
Gather the tools before your truck goes up. A floor jack, jack stands, hand tools, torque wrench, short socket set, pry bar, cutoff wheel, and silicone paste will help. Some trucks may also need minor trimming where factory flashing interferes with front spring placement.
Inspect the front spring pockets on both sides. On many C-1500 trucks, the passenger side goes together with no trouble. However, the driver's side can be tighter. That is not true on every truck, but it happens enough that you should look early instead of forcing the spring in later.
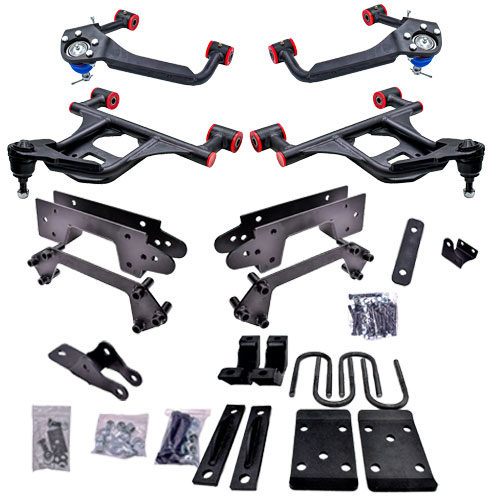
Install the Front Drop Components
The front of a 1988-1998 Chevy or GMC C-1500 4-inch front, 6-inch rear lowering kit depends on correct coil spring orientation and careful assembly around the control arms and spindle.
Check for Spring Pocket Interference
On some trucks, small amounts of factory flashing inside the driver-side spring area can block the coil during installation. If that flashing touches the spring, trimming about a quarter inch can create the needed clearance. The cut should stay clean and controlled. The goal is clearance, not removal of structural material.
This is a critical step. If the spring fights the pocket during installation, it may not seat correctly once the truck is back on the ground. If the spring enters smoothly, the rest of the assembly usually goes in much faster.
Orient the Coil Spring the Right Way
Front lowering springs have two distinct ends. One is the clamp end, where the spring was held during forming. The other is the cut end. On this setup, the cut side goes up, and the clamp side goes down. The lower end usually shows a slight angle, which helps identify the correct side.
A small amount of silicone paste in the spring cup helps the coil rotate into place as the suspension settles. That lubricant is not there to mask a problem. It is there to help the spring seat during your truck's first slow movement.
Reassemble the Front Suspension in Order
Once the spring is in place, the shock can go back on. After that, the spindle, brake caliper, and upper control arm can be reinstalled in sequence. Keep hardware organized and verify that cotter pins return to both upper and lower ball joints where required.
At this stage, some fasteners may remain snug but not fully torqued. That is normal if the suspension still needs to settle at ride height. Keep track of every point that was loosened so nothing gets missed later.
Set the Springs Before Final Tightening
A common mistake happens right after installation. The truck comes off the stands, looks good, and the job feels finished. It is not finished yet. The front springs often are not fully seated the moment the truck touches the ground. The rear bushings also need to settle in their loaded position. That is why you need a short, slow test drive.
Use a Slow Test Drive to Seat the Suspension
The first drive should be closer to the shop or driveway. Speed is not the goal, but suspension motion is. A slow pass over a mild speed bump can help the springs rotate and settle into their pockets. The same motion also helps the rear suspension bushings find their loaded position.
On some control arm setups, the spring may need this every time the suspension has been fully unloaded. That does not mean spring is falling. It means the coil needs a little movement to return to its exact seat.
A second slow pass can confirm the result. Once the spring seats are set, the control arms will usually sit flat and even. That visual check is one of the easiest ways to confirm if the coil is where it belongs.
Tighten Everything at Ride Height
After the short drive, your truck should stay on its wheels or on ramps that keep the suspension loaded. Then the final tightening can begin. This is the step that protects bushing life and helps ride quality. Rubber bushings twist as suspension parts move. If they are torqued with the suspension hanging, they start life preloaded. That can lead to binding, poor ride, and early wear.
Work from the Rear Forward
Start at the rear. Tighten the shackles, leaf spring hardware, axle hardware, and any other rear parts that were loosened during installation. Then move forward through the rest of the truck in a clear order. This approach reduces missed fasteners and keeps the process organized. It also reflects how the truck settles under load, making final checks easier.
Finish the Front Hardware and Steering Checks
At the front, verify lower control arm hardware, shock hardware, spindle hardware, and ball joint fasteners. Confirm that cotter pins are installed where needed. Then inspect the tie rod area and alignment adjusters.
This area needs extra care on a lowered C-1500. The adjusters must clear the bump stop. If they do not, the truck can damage the bump stop during suspension travel. A quick visual check here can prevent repeat work later.
Get the Alignment Setup Ready
Any truck with a lowering kit needs a professional alignment after installation. But a little preparation before alignment can save time and avoid bad habits.
Set a Rough Toe So the Truck Tracks Better
Before driving to the alignment shop, adjust the toe enough to keep the wheels reasonably straight. It does not need to be perfect. It only needs to be close enough for a safe trip and easier steering on the way there.
That small step also helps the alignment tech start from a better baseline. A wildly off-toe setting can make a short drive stressful and can scrub the tires very quickly.
Improve Access to the Alignment Adjusters
One practical trick on these trucks is trimming a section of the inner fender well. With that area open, a short socket and ratchet can reach the rear alignment adjusters more easily. That helps the alignment tech make changes without fighting the body or unloading the suspension.
Some shops will jack the truck up if they cannot reach the adjusters. That is not ideal on a freshly lowered truck that needs alignment settings checked at loaded ride height. Better access helps your truck stay in the right position during adjustment.
Tell the Alignment Shop What Changed
A lowered C-1500 is not a stock-height alignment job. The shop should know the truck has a 4-inch front and 6-inch rear drop, and the tech should check adjuster clearance around the bump stop. That note helps avoid rushed changes that create clearance problems later.
Do Not Ignore the Rear Suspension Behavior
Once the truck is back on the ground, the rear may look finished, but the bushings still need that loaded settling step before final torque. A short road test helps the rear suspension rotate into place. After that, the final tightening locks the hardware in its true ride-height position. That sequence keeps the rear end from feeling tight, noisy, or slightly twisted after installation.
If a sway bar is part of the setup, inspect link angle, hardware clearance, and full suspension travel before calling the job done. A lowered truck has less margin for contact, so even small clearance issues matter.
What Separates a Clean Installation from a Frustrating One?
A good installation is rarely about one dramatic step. It is about small decisions made in the right order. Check for flashing before forcing the spring. Install the coil in the correct direction. Use silicone paste, so the spring can seat. Drive the truck slowly to settle the front and rear. Torque everything at ride height. Prep the truck for alignment access.
Those steps are what make a lowered C-1500 feel sorted instead of rushed. The most important thing stays the same from start to finish: the suspension must settle before final tightening. When that rule guides the job, the truck stands a better chance of driving straight, wearing parts evenly, and keeping the lowered stance that made the project worth doing in the first place.
The Work Is Done, Now Drive It Right
Installing a front and rear lowering kit on a 1988-1998 Chevy or GMC C-1500 is a process that rewards patience. Every step builds on the one before it, from clearing spring pocket flashing to seating the coil correctly, settling the suspension on a slow test drive, and torquing everything at ride height.
The alignment is the final piece. Trim the inner fender well for access, set a rough toe before the drive, and make sure the shop understands what changed. A lowered truck needs an alignment done at ride height, with adjusters that clear the bump stop, not a quick spin through a generic process.
DJM Suspension builds these kits to fit right and perform right, but the results still depend on how the installation is handled. Follow the sequence, trust the process, and your C-1500 will sit exactly where it should. Shop for 1988-1998 Chevy/GMC C-1500 parts or any other parts you need on our website.
If you need help, please call 310-538-1583 now.